Sunday, 31 January 2016

Pale pink Birthday card

Hello once again bloggers

Today's card is again two tone and can be done in any colour

Shopping List

7x7 card blank
Pale pink card stock or you could make your own using colour cloud.
White card stock 
Phill Martin's Baroque everyday sentiment stamps
Creative expressions embossing folder- Star Swirls
Sue Wilson's dies - Canadian background 
                             - Lisbon
 Just Rite Heirloom Flourish one die 
Silver detail embossing powder 
Pink pearl self adhesive gems
Star dust stickles

Right, let's get cracking, I cut a piece of the pink card to mat onto the card blank and stuck it on. I then cut and embossed a piece of white card for the next layer and added this to the card.

For the centre I cut one of the Canadian background dies in white and cut it down to 5 X 5 small squares.i then cut a piece of pink card just slightly smaller and stuck them together. Then using the Just Rite die I cut 4 in white and mounted then to the back of the Canadian frame, 1 on each side. I then stuck this to the centre of the card using foam tape. The sentiment section was made by cutting the Lisbon die, just the outer in pink then the outer and fancy die in white which was layered together and another smaller frame for the sentiment.

The sentiment was stamped and heat embossed with the silver embossing powder ( with the baroque edges masked off before stamping) and stuck to the card again using some mounting foam.


To finish I edged the sentiment frame with stickles and added some pink pearls to the 4 corners and the sentiment.

Job done

Happy crafting

Alison

Thursday, 28 January 2016

Decedant Teal Birthday Card

Hello again everyone

Here's today's card, showcasing my new favourite technique on the flowers.


Shopping List

7x7 card blank
White card stock
Phill Martin's decedent jade gilding wax
Phill Martin's decedent Jade colour cloud
Phill Martin's decedent Jade mica powder
Phill Martin's decedent Jade pva glue
Phill Martin's decedent Jade twinkles
Phill Martin's scribbled stamps- scribbled frame sentiments
Creative expressions embossing folder - quilted flower
Sue Wilson's dies- Auvergne
Sue Wilson's dies- complete daisies
Sue Wilson's dies -  petite vinery
Twinkles- star dust

To start I cut a piece of card 1/2 cm smaller than the card blank and edged it with the gilding wax, using small  circular movements. I then took another piece of card, embossed it with the embossing folder and cut it to 1/2 cm smaller than the previous layer, before sticking these layers to the card I gently edged the embossed layer with the colour cloud and a smoothie.

For the centrepiece I cut the Auvergne die in 3 sections, the largest for the background, which I coloured with the colour cloud before removing the die. Next I cut the middle layer and finally the small topper for the sentiment, which I also coloured before removing the die. I then stamped the sentiment using the black soot distress ink. These were all layered together using foam pads and stuck to the middle of the card.

For the flowers I cut several of the complete daisies in different sizes, then to colour the centres I mixed a little mica power with a couple of drops of water on my mat and using a brush, painted soft strokes from the middle of the flowers towards the edge of the petals. I allowed this to dry then layered the flowers together and added them to the card with petite vinery dies. 


To finish I added some twinkles to the centre of the flowers, some pva glue dots to the two opposite corners and some stickles around the sentiment.

Thanks for popping by.

Happy Crafting

Alison


Monday, 18 January 2016

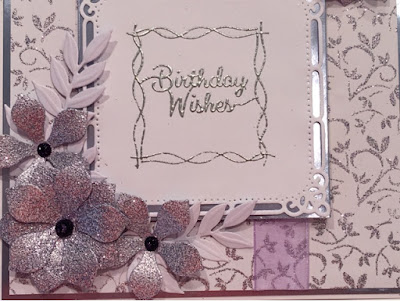
A little bit of sparkle card

Hello again

Here's today's card, unfortunately I couldn't get a good picture that shows how it sparkles but anyway here we go.


Shopping list 

6x6 card blank
Lilac cardstock, I used a satin one 
Phill Martin's background stamp - Leafy
Phill Martin's Scribbled  frame sentiments  Stamps
Lilac organza ribbon
Sue Wilson's complete orange blossom dies
Sue Wilson's laurel leaves dies
Spellbinders die - for topper, sorry I can't find the name but any square die will do
Perfect medium 
Wow glitter embossing powder in lilac aurora
Cosmic  shimmer detail embossing powder - silver
Sparkles - lavender

To start I cut a piece of the lilac cardstock 1/2 cm smaller than the card blank, and a piece of white card 1/2 cm smaller than the lilac card.

Using Phill's background stamp and the perfect medium I stamped the white card all over  and then heat embossed using the lilac aurora embossing powder.  A strip of organza ribbon was then wrapped around the card before attaching it to the card with the lilac card.

The sentiment and frame were stamped onto the square die cut topper and embossed with the cosmic shimmer detail embossing powder. Thus was then layered onto another piece of the lilac card and adde to the card.


Finishing touches- the flowers were cut and double embossed with the same glitter embossing powder, and a couple of the laurel leaves were also cut. They were added to the card bottom left and top right and some lavender sparkles were added to the middle of the card to finish.

Many thanks for having a look.

Happy Crafting

Alison

Wednesday, 13 January 2016

Just for you

Hello again bloggers

Here is today's card, done in my favourite colour. 


Shopping list

C5 card blank
White cardstock
Creative expressions embossing folder - wild roses
 Soft Cerise Colour cloud
Phill Martin's stamps - everyday scribbled corners
Phill Martin's stamps - scribbled frame sentiments
Sue Wilson's petite Vinery die
Sue Wilson's complete camellia dies
Sue Wilson's Oslo  Dies
Star dust sticklers
Small pink gems
To start I cut a piece of white card about 1/2 cm smaller than the card blank and, using a smoothie coloured right round the edge with the colour cloud. This was then stuck on to the card blank.

I then cut another piece of white card, again 1/2 cm smaller than the previous one and using the colour cloud and Phill scribbled corner Stamps stamped a sentiment on the two right hand corners. This was then stuck to the card.

The border was made cutting two pieces of card the same depth as the one that was just attached to the card, one 1\2 cm narrower than the other.  The larger strip was then edged with the colour cloud and the smaller one embossed with the embossing folder. These were then stuck together and layered onto the side of the card.

The Oslo die was used to cut the centrepiece and topper, and the sentiment was stamped with the same colour cloud. These were stuck to the card with foam pads, and added the sticklers to the edge of the topper.

Finally two of the petite vinery dies were cut and stuck on top of the embossed section of the card with a selection of the camellia flowers layered together (with alternate layers coloured with the colour cloud) and stuck in the centre, with a small pink gem added to finish.

As this card was made using white card and colour cloud it can be done in any colour.

Thanks for stopping by

Happy Crafting

Love

Alison


Graceful Mint Card

Hello again bloggers

Here's today's card, with a bit of sparkle.


Shopping List

7x7 card blank
White card
Phill Martin's :-
Graceful paper pad
Graceful mint sparkle texture paste
Graceful mint twinkles
Graceful mint gilding wax
Graceful mint p v a glue
Baroque sentiments

Sue Wilson's complete daisies die
Sue Wilson's Auvergne dies
Vinery dies - I can't remember which this is but petite vinery would look lovely.
That special touch mask- Moroccan

To start I took some white card and using the mask and the glitter paste carefully applied the texture paste using a spatula then removed the mask and allowed the paste to dry for a couple of hours.

While this was drying I took a piece of card about 1/2 cm smaller than the card blank and added some of the gilding wax around the edges. This was then stuck to the card and a layer of white card, again 1/2 cm smaller than the previous one was layered on top of the gilded card.

Then took a sheet of Phills Graceful paper pad and cut this to size to fit on the white card with a small border showing.

I then took the glittered card, trimmed it to size and cut it into 3 even sections and matted each one onto another sheet of Phills paper using the plain side and leaving a small edge showing.

These were then added to the middle of the card.

The centre sentiment was done by cutting the Auvergne die in white card, and a separate centrepiece also in white, but before removing this from the die I gently added a touch of colour to the outer edges.
I then stamped the sentiment using Phills baroque sentiments stamps masking the outer edges off before stamping. These were then added to the centre of the card with foam pads.

To finish I cut some complete daisies and edge a few petals with gilding wax, and layered them together, sticking them in diagonally opposite corners, with some leaves under he lower one. The centre was done with the twinkles and small dots if pva glue in the remaining corners finished the card off.

Here's another similar card using the same background but with Sue Wilson's New York collection dies.


Thanks for stopping by

Happy Crafting

Alison


Sunday, 10 January 2016

Sympathy Card

Hello again ,

Today's card is a simple but elegant one, not a happy theme but we all need to send them at some time.


Shopping List

7x7 card blank 
White card stock
Purple card stock
Tattered lace with sympathy dies
Phill Martin's  flower parade stamps
Phill Martin's lush leaves stamps
Creative expressions pinpoint embossing folder - floral brocade
White ribbon
Phill Martin's pva glue - vintage lavender
Distress inks - dusty concord and bundled sage 

To start I cut a piece of white card stock 1/2 cm smaller than the card blank embossed it with the embossing folder and stuck it onto the card blank.

I then cut a square of purple card to fit in the middle of the card and another white piece 1/2 cm smaller.

Using Phill's stamps,and the distress inks I stamped some flowers and leaves randomly onto the card and after die cutting the sentiment in the purple card added it to the card at the side of the flowers.

I then wrapped some white ribbon around the bottom of the stamped card with the tied bit at the front to add a little detail.

The white card was then layered onto the purple card and both these were stuck to the centre of the main card.

To finish I added some pva glue dots to two opposite corners.

Thanks for stopping by

Love

Alison


Sunday, 3 January 2016

Monochrome Birthday Card

Hello,again

Here's today's card, sorry about the photo, it looks really nice in real life, I promise!!!


Shopping List

8x8 card blank
Grey Cardstock
White card
Double sided adhesive
Diamond sprinkles glitter jewels
Phill Martin's everyday bracket sentiments 
Phill Martin's floral flourish and corners stamps
Creative expressions embossing folder - quilted flower
Sue Wilson's complete daisies
Sue Wilson's open daisies 
Spellbinders labels 28
Spellbinders gold labels 28
Small dazzler
Black gems
Star dust glitter jewels

Ok,

To start I cut a piece of grey cardstock 1/2 cm smaller than the  card blank and glued it to the card. 
Next I cut a piece of white card, again 1/2 cm smaller than the grey and using black soot distress ink stamped a semtiment around each side of the card, close to the edge , with the sentiment facing the edge on each side. I then stamped a floral flourish in each corner. 

Then I cut a narrow square frame that would sit just inside the wording and embossed it with the embossing folder. Next for the centre I cut another square of card that the frame would sit over without the edges showing on either side. I randomly stamped some of Phill's floral flourishes, again using black soot distress ink, then took a piece of double sided adhesive sheet the same size as the square and stuck it on top of the card. I then peeled off the top layer of the adhesive sheet and sprinkled some of the diamond sprinkles on top. These were rubbed in gently with my fingers and tapped off any excess which I put back in the pot.

I then glued this to the centre of the card and stuck the frame on top.

I then cut the toppers from the spellbinders dies, the larger one in the grey card and the smaller one in white, which I gently edged with the distress ink using a piece of cut n dry foam leaving the die in whilst doing this. I then stamped the sentiment using one of the bracket stamps with the brackets masked off before inking the stamp up, then removing the masks before stamping!!! I then layered the toppers together with foam tape and stuck them to the card.

To finish I cut some complete daisies with white card and some open daisies with grey card and after shaping and layering them together stuck them to the card with some dazzlers and gem in the centre.

I also edged the topper with some star dust twinkles.

Thanks for stopping by

Happy Crafting

Alison


Friday, 1 January 2016

Graceful Lilac Birthday Card

Hello and a very Happy New Year to you all

Here's today's personalised card ( it doesn't need to be personalised) that was made to order.


Shopping List

C5 card blank
Lilac card stock
White cardstock
Phill Martin's graceful paper pads
Phill Martin's scribbled sentiments
Sue Wilson's Gemini dies - Pyxis
Sue Wilson's complete camellia dies
Sue Wilson's petite vinery dies
Black soot distress inks
Cosmic shimmer glitter jewels - iced snow.
Score board - I used my hougie board
Stickles - star dust.

To start I cut a piece of lilac card 1/2 cm smaller then the card blank and using my hougie board scored along the bottom section of the card. This was then stuck to the card.
I then cut a piece of white card 1/2 cm smaller than the lilac and using my eye and the outer cutting edge and middle dies of the Pyxis cut it down to size, leaving a reasonable border at the bottom. I then pierced the edge using a piercing tool and ruler and stuck this layer to the card.

Next I took a sheet of Phill's Graceful Butterfly paper and cut it to size width wise, then using just the edge die from the Pyxis cut the sheet at the bottom, measuring it so it left a similar border at the top to that on the side, and a smaller border of white showing at the bottom. This was also then stuck to the card.

The sentiment was done by stamping a sentiment into white card and cutting this to a suitable size and then cutting another piece of lilac card slightly larger to layer it onto. This was then mounted onto the card using foam tape.

The flowers were made using several different sizes of the complete camellia flowers and shaping them  with a ball tool and manipulating them to shape, trying to make a bud with the smallest die and gradually opening the flower out. Once dry I added some cosmic shimmer glue to the petals and dipped the flowers into the glitter jewels and allowed to dry.

Once dry I stuck some petite vinery leaves to the centre of the card and added the flowers on top.

To finish I edged around the sentiment with the star dust stickles. 

Hope you like it,

Happy Crafting

Love

Alison