Sunday 27 December 2015

Graceful Blue birthday card

Hello again bloggers

Hopefully everyone had a great Christmas, and received plenty of crafty presents.
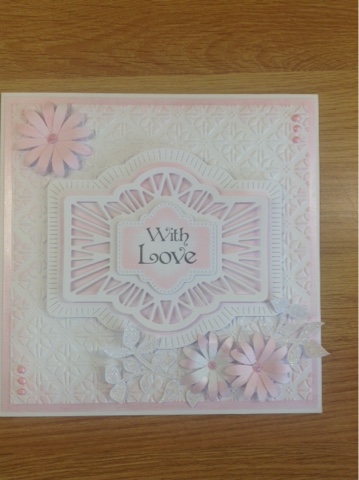
Here's today's card


Shopping List

8x8 card blank
White card stock
Phill Martin's graceful butterfly's paper pad
Phill Martin's butterfly montage stamps
Phill Martin's scribbled  everyday corner sentiments
Phill Martin's scribbled frame sentiments
Sue Wilson's double pierced squares
Sue Wilson's Madison square die
Sue Wilson's complete camellia dies
Sue Wilson's open camellia dies
Glossy accents
Spellbinders butterfly die
Black soot distress ink
Selection of blue ink pads
Twinkles - star dust
Small dazzler
Small gem

To start, and using the plain side of one of Phill's graceful butterfly pad I cut a sheet 1/2 cm smaller than the card blank.

I then made a frame to the size I wanted, with white card stock using 2 of the double pierced dies. Next using Phill's corner stamps, stamped a sentiment in the two top corners with the black ink, then using the montage stamps and shades of blue ink randomly stamped images onto the rest of the card.

I cut the butterfly sheet of Phill's paper to fit in the frame with a small overlap, and stuck this behind the frame using cosmic shimmer glue. These were all then stuck to the card.

For the centre I cut the Madison square die and a square topper. I then stamped the topper with the scribbled frame and a sentiment, these were then added to the centre of the card using foam pads between each layer. 

Finishing touches


I made  some tiny flowers using both the camellia dies, the complete petals were cut in blue card and the open ones in white. These were stuck together and covered with glossy accents and allowed to dry.

Once dry I layered two of each flowers together, stuck the larger one on the top of the card and the small one offset on the sentiment and added a dazzler/gem to,the centre. I then edged the sentiment with the twinkles.

Finally I cut a butterfly from a cut off of Phill's paper stuck it to the bottom corner of the card and added some twinkles.

Hope you like it.

Happy crafting 

Love

Alison

Sunday 20 December 2015

Graceful Pink Birthday card

Hello again bloggers

Sorry its been a while but I've had a busy couple of weeks, hopefully I'm back on track now.

Today's card is one very similar to one made at Phill Martin's fantastic Craftathon a few of weeks ago.


Shopping List

8x8 card blank
White card stock
Phill Martin's Graceful butterfly's paper pad
Phill Martin's graceful pink mica powder
Phill Martin's graceful pink sparkle texture paste
Phill Martin's graceful pink pva glue
Phill Martin's graceful pink twinkles
Phill Martin's graceful pink gilding wax
Phill Martin's scribbled sentiments stamp
Phill Martin's elegant relatives stamps
Sue Wilson's double pierced squares 
Sue Wilson's Scandinavian collection corner border and tag
Sue Wilson's Dainty rectangular frame
Sue Wilson's orange blossom complete petals 
Spellbinders butterflies
Creative expressions embossing folder - rambling blossom
Mask with a small design
Cosmic shimmer detail grey embossing powder
Cosmic shimmer glitter jewels- iced snow

Blimey that seems a lot - 

Anyway cracking on

Firstly I cut a piece of white card stock, 1/2 cm smaller than the card blank and gilded around the edges with the gilding wax, just rubbing the wax in smaller circular movements with my finger.

This was then stuck to the card blank. Next another pice of white card was cut using the pierced dies, about 1/2 cm smaller than the gilded card and layered on to the card.

I then chose a sheet of Phill's paper and cut this 1/2 cm smaller than the pierced square and stuck this to the card.

I then cut a strip of white card to go down the middle of the card, embossed it with the embossing folder and after cutting Scandinavian border die out and carefully cutting it in half lengthwise glued it to the side edges of the embossed strip. This was then attached to the middle of the card using foam pads.

I then cut the dainty rectangular frame and insert and using a mask with a small cross applied some glitter plaster to the insert and allowed it to dry. The frame and insert were then stuck together flat, and then the whole thing onto the card with foam pads.

I then took a piece of white card wide enough to to fit the sentiment that I wanted and long enough to fit across the card allowing extra length for it to curve in the middle. I cut the ends into a V shape and stamped the sentiments with perfect medium and heat embossed it with the silver detail embossing powder. This was then edged with the cosmic shimmer glue and dipped in the iced snow before leaving to dry before sticking to the card at each side making sure that this bowed slightly in the middle.


Finishing touches - I cut several of the lovely new orange blossom flowers and then using a few drops of water and some of the mica powder mixed these together to make a paint, and painted the centre of the flowers, flicking out towards the petal edges. Once dry I shaped the flowers and a couple of the larger ones were layered together and then all the flowers were added to the card in quite a random way.

I then cut a butterfly from a scrap of Phill's paper pad and stuck this to the card.

I edged the centre frame with some twinkles and also added the twinkles to the centre of the flowers.

Finally, using some of the pva glue I added small dots down the side of the Scandinavian border.

Yippee all done.

Happy Crafting

love 

Alison


Sunday 6 December 2015

A birthday card - at last

Hello again bloggers

A bit of a change of theme today, this is a birthday card made for a friends wife.


Shopping list

8x8 card blank
White card
Mauve foundations card
Creative expressions embossing folder- 
Phill Martin's scribbled sentiments stamps
Phill Martin's elegant family stamps
Pva glue - 
Sue Wilson's Pyxis Gemini die
Sue Wilson's Stockholm die
Piecing rule and tool
Mauve seam binding ribbon
Pearl stick pins
Small dazzler
Dusty concord distress ink 

Ok, here goes

The first layer is cut from the mauve card,1/2 cm smaller than the card blank.
The next is cut from white card, again 1/2 cm smaller than the previous one and then pierced around each edge using the rule and piercing tool.

The next layer was cut from white card1/2 cm smaller than the previous one and embossed using the embossing folder (some of this will be cut off at the bottom).
Another piece of white card was cut the same width as the embossed one but about 1/2 the height and scored lengthways to create indentations into the card.

These will be stuck to,the card with the Pyxis die hiding the join, to cut the Pyxis I just used the edge. Cutting dies with the mauve card and all 3 dies in white to sit on top and glued them together. I decided where I wanted the Pyxis to sit on the card and cut the embossed card and scored card to fit so,the joins were hidden, then attached all the layers to the card with the Pyxis being the last one to stick on.

Next for the centre sentiment, I cut the base layer in mauve using just the edge Stockholm die and the the next layer in white with the edge and fancy dies. 

I then cut the next size down in white to stamp the sentiment on and leaving the die on the cut shape, I gently added a little dusty concord distress ink using some cut and dry foam. I then removed the die and stamps the sentiment using Phill's family stamps and some black soot distress ink.

These were then layered together and attached to the card with foam pads.

For the Happy Birthday, I stamped the sentiment onion some white card, again with the distress ink, and cut it to size, then I cut another piece of mauve card 1/2 cm bigger than the sentiment, layered them together and stuck them to the bottom of the card.

To finish I made a triple bow using some seam binding and glued it to the card at a jaunty angle, stuck the pearl pins into the glue under the bow, added a dazzler to the centre and some pva glue dots to the rope right side.

Sorry if that was a bit lengthy will try do a simpler one next time.

Happy crafting

Love 

Alison

Wednesday 2 December 2015

Back to Poinsettia's

Hello once again

Here is today's offering, I think could be the last Christmas card for now.


Shopping List

7x7 card blank
White card
Colour cloud - Scarlet woman
Sue Wilson's double pierced squares
Sue Wilson's de bossed snowflake die
Sue Wilson's classic poinsettia die
Creative expressions contemporary poinsettia embossing folder
Creative expressions elegant poinsettia stamp
Creative expressions poinsettia medallion stamp
Cosmic shimmer silver detail embossing powder 
Phill Martin's stamps - bauble opulence
Organza ribbon
Small dazzler
Small clear gem
Star dust stickles

To start I cut a square of white card 1/2 cm smaller than the card blank and coloured the edges with the colour cloud. 

Next, using the double pierced dies I cut a square slightly smaller than the previous one.

Another layer was cut 1/2 cm smaller than the pierced one and again edged with the colour cloud.

Yet another layer was then cut ( this is getting a bit repetitive isn't it) and embossed with the embossing folder.

All the layers were then added to the card, but a strip of ribbon was put across the embossed layer first and fastened at the back before sticking this layer to the card.

Next I stamped  the poinsettia medallion stamp and 2 of the middle size poinsettia stamps onto white card with some perfect medium and heat embossed them with the embossing powder. I then carefully place the dies around the images and cut them out.

The frame was stuck to the card with foam pads. The oval frame was also cut out and stamped and embossed with the sentiment, which was added to the middle of the frame and edged with some star dust stickles


A large triple bow was added to the bottom side of the card and the poinsettia flowers were shaped and stuck on top of each other, on top of the bow with a dazzler in the middle.

A tiny poinsettia flower was added to the frame and finished off with a small gem.

Happy Crafting

Love

 Alison


Friday 27 November 2015

Now it's seems it's a holly theme !!!

Morning again crafters.

Here's today's card, holly again but totally different to the previous one.


Shopping List

7x7 card blank
White card
Sue Wilson's mini holly striplet die
Sue Wilson's holly dies
Sue Wilson's Madison Square  Die
Creative expressions swirling holly embossing folder 
Phill Martin's Christmas sentiments stamps
Creative expressions polished silk glitter - dark emerald and fire red
Creative expressions detail embossing powder- silver
Double sided adhesive sheet
Double sided tape.

To start I cut a piece of white card 1/2 cm smaller than the card blank, and carefully stuck a strip of double sided adhesive round all the side trying to make sure that all the edges met evenly
. I then peeled off the top layer and sprinkled some of the green polished glitter around me all,the edges.

Next I cut another piece of white card 1/2 cm smaller than the previous one and embossed it with the embossing folder. These layers were then stuck to the card blank, giving the look of an entire green base card.

To make the border I cut the holly striplet and frame from some white card and then stuck some double sided adhesive to the back, then burnished the green glitter into the spaces. For the berries I added small blobs of glue and covered them with the red glitter.


The border was then stuck to the side of the card.

To make the sentiment section I cut a frame using the Maddison square die then cut another piece of card, this time 1/2cm bigger than the frame and using the same technique as before edged it with the glitter.

Using Phill's stamp and perfect medium I heat  embossed the sentiment using the silver detail embossing powder onto the card cut with the Madison square die.

These two layers were then stuck together and added to the card with foam pads.

Lastly I cut some holly and berries out of some white card that I had added some double sided adhesive to, coloured them with the glitters and stuck them to the card.

Hope this all makes sense !!

Happy crafting

Love

Alison


Thursday 26 November 2015

Still focusing on Christmas

Hello bloggers

Here's today's card,  this one would be great for posting as it's quite flat. And it's a quick card to make.


Shopping List

7x7 card blank
Green card- mine had a satin finish
White card
Small amount of red card
Sue Wilson's noble double pierced squares
Sue Wilson's happy Christmas die
Sue Wilson's filigree Holly die
Creative expressions embossing folder- large swirling holly
Glossy accents
Glitter jewels glacier ice

The first layer was cut in green about 1/2 cm smaller than the card and stuck to the card blank. Next I cut a square with the double pierced square die slightly smaller than the green layer and added it to the card. Then another piece of white card was cut this time around 1cm smaller than the previous one and this was embossed with the embossing folder and the edge glued with cosmos shimmer glue and covered in the glitter jewels before adding to the card.

Finishing touches 


I cut the sentiment from the same green card and stuck it to the middle of the card.
I then cut a couple of the double holly leaves from the green cardstock and two of the triple berries in red. I attached one set  to the top right, the other to the bottom left and put some glossy accents on the berries and allowed to dry.

Job done

Until next time 

Happy crafting 

Love 

Alison

Monday 23 November 2015

Similar, but not quite!

Morning once again

Sticking to a similar theme, but this time I've gone platinum instead of silver.


Shopping List

7x7 card blank
White card
Sue Wilson's double pierced noble squares dies
Sue Wilson's noble classic adorned Dies
Sue Wilson's noble ornate pierced Dies
Sue Wilson's poinsettia dies
sue Wilson's pierced flags  Dies
Phill Martin's stamps - Bauble Elegance
Stamps to die for - florentine background
Creative expressions embossing folder - contemporary poinsettia's
Organza ribbon
Stamps by Chloe - Christmas foliage
Small dazzler
Clear gems
Wow metallic platinum glitter embossing powder

To start I took one of the largest pierced squares and cut a piece of white card to mat onto the card blank.

I then cut another piece of white card about 1/2 cm smaller than the previous one and embossed it with the embossing folder.

Next I stamped the background section using the florentine background Stamp and perfect medium and heat embossed it with the platinum embossing powder.

To make the frame I used the classic adorned dies in the foreground and for the back layer, the same smaller die but used the largest from the ornate pierced set. These were then stuck together using foam pads, in then stuck to the embossed background and this was trimmed to fit. The whole thing was then stuck to the card with foam pads.


Finishing touches

I cut the small pierced flag and stamped a sentiment from Phill's bauble elegance collection with the perfect medium and again heat embossed it with the same powder. This was then attached to the middle left side of the card.

Still using the platinum embossing powder i made a couple of fronds from chloes foliage on heat resistant acetate cut around them and stuck them to the side.

Then on top goes an organza bow and two of the small poinsettia flowers that have been covered in perfect medium and heat embossed with the embossing powder, 2 coats are probably best here.

A dazzler was put in the centre and a few gems in the opposite corners

Happy crafting

Love 

Alison


Wednesday 18 November 2015

And another - I think I got carried away

Hello again, yes I know but I was having fun, silver and white yet again

Anyhow here's today's card


Shopping List

7x7 card blank
White card stock
Silver Miri card
Creative expressions mobs sing folder - frosty swirls
Sue Wilson's noble double pierced squares dies
Sue Wilson's snowflake corner border and tag dies
Sue Wilson's snowflake dies 
Phill Martin's Sentimentally Yours stamps - snowflake flourishes
Wow embossing powder- silver dollar 
Silver ribbon 
Dazzlers

To start I cut a piece of silver Miri 1/2 cm smaller than the card blank and glued it on.
I then cut a piece of white card using the double pierced dies slightly smaller than the Miri card and layered on top of the Miri.

Next I cut another square of white card leaving a slightly bigger gap between the matting and layering and embossed it with the embossing folder. Again this was added to the card.

For the centre section I cut another piece of Mirii leaving about 2,5 cm of the embossed card showing around the edges, and a piece  of white card 1/2 cm smaller. stamped the snowflake flourishes randomly on the white card using perfect medium and heat embossed it using the silver dollar embossing powder. These were then layered together and added to the card.

I then cut one of the snowflake tags and stamped onto it one of Phill's sentiments again with the perfect medium and embossing powder and heat embossed to set.

This was then stuck to the centre of the card with foam pads, and a couple of small gems were added to the snowflakes.

I cut a couple of Sue's snowflakes, covered them in perfect medium and the embossing powder and again heat embossed them. Two layers seems to give better coverage.

I added a big silver bow to the top side with a snowflake and dazzler on top, another snowflake to the opposite bottom side with a gem in the centre, and a couple of silver dots from my stash  to the remaining  corners.

Until next time

Happy crafting

Love

Alison


Sunday 15 November 2015

Sliver and White card ( I told you so)

Well don't say I didn't warn you. Here is another card made in silver and white.


Shopping list

7x7 card blank
Silver Miri card
White card 
Parchment
Heat resistant acetate 
Creative expressions contemporary poinsettia  Embossing folder 
Sue Wilson's de bossed snowflake die
Sue Wilson's double pierced noble squares ties
Creative expressions shaded Poinsettia stamp
Creative expressions poinsettia medallion stamp
Phill Martin's Christmas sentiments  Stamp
Stamps by Chloe Christmas foliage Stamps
Organza ribbon
Creative expressions dazzler 
Small clear gems
Wow silver dollar embossing powder 

To make the card I started by cutting a piece of Miri card 1/2 cm smaller than the card blank and stuck it on. 
Next using the noble double pierced dies I cut a piece of white card slightly smaller than the Miri and layered it on top.
Next another piece of white card cut 1/2 cm smaller than the previous one, was embossed with the contemporary poinsettias folder and added to the card..

Then using another piece of white card, the perfect medium and the  poinsettias medallion stamp, I stamped, added the silver dollar embossing powder and heat embossed.

Using the outer edges of the de bossed snowflake I carefully cut out the stamped image, remembering to save both pieces.


Using the inside piece, and one of Phill's Christmas Sentiments stamps I heat embossed this using the same products. This was then stuck flat onto the card, towards the top in the centre and the border was added around it using mounting foam. 

For the finishing touches


I stamped two of the shaded poinsettia's onto some parchment, with the same method as before and cut them out. Also using the heat resistant acetate I stamped and embossed ( again as above) a couple of Chloes Christmas foliage stamps and then cut these out too.

I stuck the foliage to the bottom side of the card, added an organza bow and the stuck the poinsettia's on top.

Finally I added a dazzler to the centre of the flower and so me gems to the other 3 corners.

Hope you like it

Happy crafting as always

Love

 Alison


Wednesday 11 November 2015

I've got the silver and white bug

Good morning.

Well it appears that I have developed a bug for making silver and white Christmas cards at the moment so there may be a theme developing over my next few blogs.

Anyway here is today's card 


Shopping list

C5 landscape card blank 
Silver Miri card
White card stock 
Creative expressions embossing folder- Swirling Holly
Phill Martin's stamps- Christmas Holly more decorative sentiments
Creative expressions stamps- shaded poinsettias 
Stamps by Chloe - Christmas foliage 
Parchment paper 
Heat resistant acetate 
Perfect medium
Cosmic shimmer detail embossing powder- silver
Wow embossing powder- silver dollar 
White ribbon
Creative expressions dazzler 
Small gems

Firstly I cut a piece of the Miri card 1/2 cm smaller than the card blank and a piece of white card 1/2 cm smaller than the Miri and embossed it with the embossing folder. These were then matted and layered onto the card blank.

I then stamped the sentiment onto a piece of white card using the perfect medium and heat embossed it using the detail embossing powder. I then cut it out and also cut another piece of Miri 1/2 cm bigger for the background, and stuck them to the centre of the card.

For the finishing touches 


Using the parchment and silver dollar embossing powder I stamped and heat embossed 3 of the smallest poinsettia flowers  and 2 of the next size up. I then cut then out using scissors but if you have sue Wilson's poinsettia dies you could use them to cut the flowers out.

I also stamped a couple of Chloes Christmas foliage stamps onto some heat resistant acetate using the same products and heat embossed them as well. I then roughly cut around the images removing any excess acetate.

Next I made a double bow with some white organza ribbon.

Finishing touches

To finish the card I added the bow in the top right with some glue gel, and stuck one of the small flowers on top with a small clear gem in the centre.

I stuck the two larger flowers together and glued them onto the bottom right of the card, then placed and glued the foliage to the card, the two smaller poinsettias either side of the larger flower and a dazzler and gems to the centre of the flowers.

Another card complete

Thanks for having a look

Love

Alison

Sunday 8 November 2015

Snowflake Striplet Card

Hello again

I was really pleased with today's card and I have made it in several different colours, anyway here it is.


And here's the shopping list 

7x7 card blank
White card
Coloured card
Creative Expressions frosty swirls Embossing folder 
Sue Wilson's snowflake mini striplet die
Sue Wilson's snowflake dies
Sue Wilson's Pierced Flags Dies
Phill Martin's Christmas sentiments holly border stamps
Seam binding 
Ink pad to tone with the coloured card 
Creative expressions dazzler 
Small clear gems
Star dust stickles

Firstly, I cut a piece of the coloured card stock slightly smaller than the card blank and attached it to the top of the card, then cut a piece of white card again about 1/2 cm smaller than the previous one and embossed it with the embossing folder. This was then matted onto the coloured card.

Next, with another piece of white card, I cut the striplet 3 times next to each other without using the edge die. I then trimmed the edges to leave a small border and backed this with another piece of the coloured card. This was then stuck in the middle of the card with the joins going horizontally.

Next, using Sue's pierced flag dies I cut a large one from the coloured card and a smaller one from the white card. I stamped the sentiment onto the white card using Phill's Holly Border Sentiment stamps  with the flourishes on the edges masked off and coloured the edges with a little of the ink. I layered these together and added them to the middle left of the frame.

Finishing touches

I cut some of Sue's snowflakes and added them to the right hand side at the top and bottom of the card. 
A bow was made from seam binding and stuck on to cover the edges of the Sentiment flags, another snowflake on top of the bow and a dazzler on top of that.

Small gems were stuck in the centre of the snowflakes, and on the striplet, the sentiment strip was edged with the stickles, and little dots of the stickles were added to the embossed background.

As I mentioned this can be done in whatever colour you want. For example, here is  the card made in red


Happy Crafting

Love

Alison.

Wednesday 4 November 2015

Christmas Tree Card

Hello again

Here it today's card. I'm sticking with the Christmas theme at the moment.


Shopping List

C5 card blank.
Silver Miri card
White card stock
Creative Expressions snowflake lattice embossing folder
Snowflake embossing folder ( from the snowman)
Heat resistant acetate 
Sue Wilson's noble ornate pierced Dies
Sue Wilson's noble classic adorned Dies
Phill Martin's  holly sentiments borders Stamps
Stamps by Chloe Starry Christmas tree
Perfect Medium 
Mounting foam
Wow metallic silver sparkling embossing powder
Small gems
Small dazzler
Seam binding ribbon

Ok here goes,

I started by gluing a piece of the silver Miri card about 1/2 cm smaller than the card blank to the top of the card.

I then cut a piece of white card, again about 1/2 cm smaller than the previous one, embossed it using the snowflake lattice embossing folder and layered it n to the Miri card.

I then took a piece of heat resistant acetate, wiped it with an anti static bag, and using the perfect medium stamped Chloes tree to the centre. I then added the embossing powder and heat embossed it.

I cut a small frame using the larger dies from both the noble sets and glued the acetate to the back. Once set I trimmed the edges to remove any excess acetate.

Using the centre that was cut when making the frame, I embossed that s with the snowflake embossing folder and stuck it to the card in the centre towards the top and added some small gems to the centre of the snowflakes. I then added some very narrow mounting foam to the back of the frame and stuck it onto the card over the centre frame. And added some money re of the same gems to the tree.

I then cut a border of silver Miri and a slightly smaller piece of white card which I then stamped with Phill's border sentiment and some perfect medium and heat embossed it with the sa,e embossing powder as the tree. These were then matted together and stuck to the bottom of the card.

To finish I made a triple bow, added to the bottom of the tree and stuck a small dazzler in the middle.

Thanks for stopping by.

Happy crafting as always

Love Alison


Sunday 1 November 2015

Snowflakes on Acetate

Morning all

Sticking with the Christmas theme, here is today's card.


Shopping List

7x7 card blank
White card stock
Acetate
Snowflake mask
Creative Expressions Snowflake Lattice Embossing folder
Sue Wilson's noble pierced squares Dies
Sue Wilson's snowflake Corner border and tag dies
Phill Martin's Frosty Jade colour cloud
Phill Martin's Frosty Jade Glitter Texture Paste.
Phill Martin's Bauble Elegance  Stamps
Black ink
Seam binding ribbon
Creative expressions small dazzler.
Small clear gems.

Firstly, using the mask and the glitter paste, I stencilled this onto the acetate and put to one side to dry. I tend to leave things like this overnight to allow it to dry properly, but a couple of hours would probably do.

I then cut a piece of white card 1/2 cm smaller than the card blank and coloured the edges with the frosty Jade colour cloud using a smoothie, this was then glued onto the card blank.

I then cut another piece of white card 1/2 cm smaller than the previous one and embossed it with the snowflake lattice embossing folder before sticking this on the previous layer.

The frame was cut using the pierced squares, 1 just using the  edge dies and another with the decorative element added. I then coloured the plain one with the colour cloud and stuck them together.

I then cut the acetate to size to fit behind the frame, attached the acetate to the frame with cos,I'd shimmer glue and stuck this on the front of the card with some mounting foam.

Next I cut the tag from Sue's snowflake corner, border and tag and stamped the sentiment from Phill Martin's Bauble Elegance stamps, and edged the tag with a hint of the colour cloud.This was then added to the centre of the acetate.


Finally a triple bow was added to the side, with a small dazzler in the middle and a couple of small gems added to the centre of the snowflakes on the tag.

I'm really pleased with this card, and it can be done in any colour.

Until next time

Happy crafting

Love 

Alison


Wednesday 28 October 2015

It's that time of year!!! Silver (or gold) Christmas card

Hello again


I thought I'd show a Christmas card today, as now the clocks have changed it will be here before we know it.


Anyway here's the card made in silver

Shopping List

7x7 card blank
Silver card stock - I used a mat silver
White card stock
Phill Martin's holly decorative frame - snow stamp
Phill Martin's Holly insert frame merry Christmas Stamp
Phill Martin's Christmas holly sentiment borders Stamps
Happy Christmas from Phill Martin's Chrisrmas sentiments collection  Stamps
Creative expressions Swirling Holly Embossing folder
Cosmic shimmer silver detail embossing powder
Perfect medium pad
White seam binding
Creative expressions small dazzler.

Firstly I cut a piece of silver card slightly smaller than the card blank and attached it to the card blank
I then cut a pice of plan white card, again this time slightly smaller than the sliver card( about 1/2 cm). Before attaching this to the card blank  I stamped the top and bottom with a border from Phills holly sentiment borders Stamps using perfect medium and the embossing powder, and heat embossed these. This was then attached to the card.

I then cut a small border of the silver card to run across the middle of the design and another piece of white card 1/2 cm smaller, which I embossed with the swirling holly Folder before layering both pieces to the card.

On another piece of white card, and using the same method as the border I stamped and embossed the holly decorative and holly insert frames. I then carefully cut these out and before adding them to the centre of the card stamped the sentiment from Phill's Christmas Sentiments stamps on the top layer.

Once these were all attached to the card made a triple bow using the seam binding ( see Phill's u- tube video on how to do this) attached it to the card, and cut a little set of tails which were fixed under the top layer at the bottom. A small dazzler stuck in the centre of the bow finished the card off.

Here is the same card made in gold, only this time the sentiment is the one from the holly insert frame. I love them both .

Until next time

Happy crafting

Love

Alison
xx


Sunday 25 October 2015

Pretty in Pink Card

Hello once again.

Today I thought I'd share this pretty pink card. 


Shopping list

7x7 card blank
White card stock
Spun sugar distress ink
Black soot distress ink
Phill Martin's Graceful Pink gilding wax, pva glue and twinkles
Phill Martin's Baroque Sentiments Stamps
Creative Expressions embossing folder - Quilted flower
Sue Wilson's Auvergne Die
Sue Wilson's  Complete daisies dies
Sue Wilson's petite Vinery dies
Stickles in star dust


Firstly I cut a piece of white card slightly smaller than the card blank, rubbed the edges with the gilding wax,( I find small circular movements work best for an even finish) and after leaving this for a while buffed it up using a dry wet wipe to enhance the shine of the wax. I then attached this to the card blank.

Next I cut another picce of card about 1/2 cm smaller than the previous one and embossed it with the embossing folder. I lightly coloured the edges with the spun sugar distress ink than attached this to the card

Using the largest 2 of the Auvergne Dies I cut out the background for the topper and leaving the dies attached to the card gently applied some of the distress ink to the card. Then when you remove the dies this leaves a white edge.

The next layer was cut using the decorative die and left white. A further layer was cut with the small die and the same method with the ink was used on the top layer, gradually fading this so the middle was still white.

I then stamped the sentiment with black soot on the top layer,  by masking off the decorative areas of Phill's stamp with some tape leaving just the sentiment.

These were then layered up with mounting foam and attached to the centre of the card.

For the finishing touches I added 2 petite vinery flourishes  and some daisies that I had gilded with the wax or coloured with the ink. Put some pva glue dots in the 2 remaining corners, some twinkles to the middle of the flowers and added some stickles to the vinery leaves.

Thanks for stopping by

Until next time

Happy crafting

Alison


Wednesday 21 October 2015

Mum's Birthday Card

Hi again, and welcome to my next blog.

Today I thought I'd share how I made my mums birthday card.


Shopping List

8x8 card blank
Phill Martin's  Chic floral paper pad
Phill Martin's Chic blue Embossing powder
White card stock
Creative Expressions embossing folder - rambling blossoms
Phill Martin's chic floral everyday sentiments Stamps
Phill Martin's chic floral corner borders and iconsStamps
Phill Martin's  elegant family stamps
Sue Wilson's Stockholm and Oslo dies
Sue Wilson's petite vinery dies
Sue Wilson's open and complete daisy dies
Seam binding in blue
Creative expressions pearl hat pins
Stickles - star dust
Glossy accents

Firstly I took one of Phill's papers from the Chic Floral pad and using the plain side ( yes it know it's a shame not to use the patterned side) I cut it down to leave a small border showing on the card blank, embossed it with the Rambling blossom  Embossing folder and glued it to the card.

I then cut a strip of white card the same width as the blue embossed layer and about 4 cm deep and stamped the corner flowers from Phill's stamps at angles either side of the card near the outer edge. This was then glued to the card in the centre.

I then cut a square of white card the right size to leave just the flowers showing on the white border strip and the cut a square from the floral pad about 0.5 cm smaller and glued them together then stuck them onto the card.

Using Sue Wilson's  Stockholm and Oslo Dies I cut a frame of each and stuck these together. I then cut the inner from the Oslo die to stamp the centre sentiment on and the inners from Oslo and Stockholm for the" to a special mum "bit.

Using Phill's Chc Floral everyday Stamps, I stamped the centre sentiment with perfect medium and heat embossed using his Chic Blue embossing powder. Then did the same with  the one for mum using Phill's elegant Family stamps, these were all then matted together attached to the card.

For the finishing touches, I cut two of Sue's petite vinery flourishes in white, some of Sue Wilson's complete daisies in the blue of the background and some of the open ones of the same size in white. I then stuck the white ones on top of the blue and when the glue was dry I filled the middle of each petal with glossy accents and allowed to dry. 

I stuck the petite vinery to the bottom right of the card and layered two of the largest daisies together before placing on top of the vinery. I also added one more double flower and two singles to the top left corner. Using the stickles I added a bit of glitter to the vinery leaves and the frame of the sentiment


I then made a triple bow ( see Phill Martin's u tube video) added it to the top of the sentiment upside down and tucked some extra tails under the bottom of the sentiment. 

Finally I added some small dazzlers and gems to the centre of the flowers and stuck two hat pins into the bow.

Job done!!!

Happy Crafting

Love Alison