Wednesday 28 October 2015

It's that time of year!!! Silver (or gold) Christmas card

Hello again


I thought I'd show a Christmas card today, as now the clocks have changed it will be here before we know it.


Anyway here's the card made in silver

Shopping List

7x7 card blank
Silver card stock - I used a mat silver
White card stock
Phill Martin's holly decorative frame - snow stamp
Phill Martin's Holly insert frame merry Christmas Stamp
Phill Martin's Christmas holly sentiment borders Stamps
Happy Christmas from Phill Martin's Chrisrmas sentiments collection  Stamps
Creative expressions Swirling Holly Embossing folder
Cosmic shimmer silver detail embossing powder
Perfect medium pad
White seam binding
Creative expressions small dazzler.

Firstly I cut a piece of silver card slightly smaller than the card blank and attached it to the card blank
I then cut a pice of plan white card, again this time slightly smaller than the sliver card( about 1/2 cm). Before attaching this to the card blank  I stamped the top and bottom with a border from Phills holly sentiment borders Stamps using perfect medium and the embossing powder, and heat embossed these. This was then attached to the card.

I then cut a small border of the silver card to run across the middle of the design and another piece of white card 1/2 cm smaller, which I embossed with the swirling holly Folder before layering both pieces to the card.

On another piece of white card, and using the same method as the border I stamped and embossed the holly decorative and holly insert frames. I then carefully cut these out and before adding them to the centre of the card stamped the sentiment from Phill's Christmas Sentiments stamps on the top layer.

Once these were all attached to the card made a triple bow using the seam binding ( see Phill's u- tube video on how to do this) attached it to the card, and cut a little set of tails which were fixed under the top layer at the bottom. A small dazzler stuck in the centre of the bow finished the card off.

Here is the same card made in gold, only this time the sentiment is the one from the holly insert frame. I love them both .

Until next time

Happy crafting

Love

Alison
xx


Sunday 25 October 2015

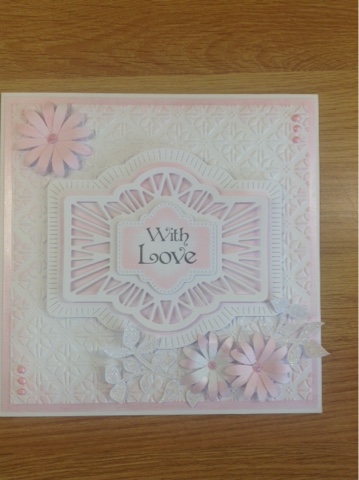
Pretty in Pink Card

Hello once again.

Today I thought I'd share this pretty pink card. 


Shopping list

7x7 card blank
White card stock
Spun sugar distress ink
Black soot distress ink
Phill Martin's Graceful Pink gilding wax, pva glue and twinkles
Phill Martin's Baroque Sentiments Stamps
Creative Expressions embossing folder - Quilted flower
Sue Wilson's Auvergne Die
Sue Wilson's  Complete daisies dies
Sue Wilson's petite Vinery dies
Stickles in star dust


Firstly I cut a piece of white card slightly smaller than the card blank, rubbed the edges with the gilding wax,( I find small circular movements work best for an even finish) and after leaving this for a while buffed it up using a dry wet wipe to enhance the shine of the wax. I then attached this to the card blank.

Next I cut another picce of card about 1/2 cm smaller than the previous one and embossed it with the embossing folder. I lightly coloured the edges with the spun sugar distress ink than attached this to the card

Using the largest 2 of the Auvergne Dies I cut out the background for the topper and leaving the dies attached to the card gently applied some of the distress ink to the card. Then when you remove the dies this leaves a white edge.

The next layer was cut using the decorative die and left white. A further layer was cut with the small die and the same method with the ink was used on the top layer, gradually fading this so the middle was still white.

I then stamped the sentiment with black soot on the top layer,  by masking off the decorative areas of Phill's stamp with some tape leaving just the sentiment.

These were then layered up with mounting foam and attached to the centre of the card.

For the finishing touches I added 2 petite vinery flourishes  and some daisies that I had gilded with the wax or coloured with the ink. Put some pva glue dots in the 2 remaining corners, some twinkles to the middle of the flowers and added some stickles to the vinery leaves.

Thanks for stopping by

Until next time

Happy crafting

Alison


Wednesday 21 October 2015

Mum's Birthday Card

Hi again, and welcome to my next blog.

Today I thought I'd share how I made my mums birthday card.


Shopping List

8x8 card blank
Phill Martin's  Chic floral paper pad
Phill Martin's Chic blue Embossing powder
White card stock
Creative Expressions embossing folder - rambling blossoms
Phill Martin's chic floral everyday sentiments Stamps
Phill Martin's chic floral corner borders and iconsStamps
Phill Martin's  elegant family stamps
Sue Wilson's Stockholm and Oslo dies
Sue Wilson's petite vinery dies
Sue Wilson's open and complete daisy dies
Seam binding in blue
Creative expressions pearl hat pins
Stickles - star dust
Glossy accents

Firstly I took one of Phill's papers from the Chic Floral pad and using the plain side ( yes it know it's a shame not to use the patterned side) I cut it down to leave a small border showing on the card blank, embossed it with the Rambling blossom  Embossing folder and glued it to the card.

I then cut a strip of white card the same width as the blue embossed layer and about 4 cm deep and stamped the corner flowers from Phill's stamps at angles either side of the card near the outer edge. This was then glued to the card in the centre.

I then cut a square of white card the right size to leave just the flowers showing on the white border strip and the cut a square from the floral pad about 0.5 cm smaller and glued them together then stuck them onto the card.

Using Sue Wilson's  Stockholm and Oslo Dies I cut a frame of each and stuck these together. I then cut the inner from the Oslo die to stamp the centre sentiment on and the inners from Oslo and Stockholm for the" to a special mum "bit.

Using Phill's Chc Floral everyday Stamps, I stamped the centre sentiment with perfect medium and heat embossed using his Chic Blue embossing powder. Then did the same with  the one for mum using Phill's elegant Family stamps, these were all then matted together attached to the card.

For the finishing touches, I cut two of Sue's petite vinery flourishes in white, some of Sue Wilson's complete daisies in the blue of the background and some of the open ones of the same size in white. I then stuck the white ones on top of the blue and when the glue was dry I filled the middle of each petal with glossy accents and allowed to dry. 

I stuck the petite vinery to the bottom right of the card and layered two of the largest daisies together before placing on top of the vinery. I also added one more double flower and two singles to the top left corner. Using the stickles I added a bit of glitter to the vinery leaves and the frame of the sentiment


I then made a triple bow ( see Phill Martin's u tube video) added it to the top of the sentiment upside down and tucked some extra tails under the bottom of the sentiment. 

Finally I added some small dazzlers and gems to the centre of the flowers and stuck two hat pins into the bow.

Job done!!!

Happy Crafting

Love Alison


Sunday 18 October 2015

Monochrome Birthday Card

 Hello again


Today I'd thought I'd share this card as I was really pleased with it, and I'm not usually a black and white girl.

I also thought I'd do a shopping list to make it easier to assemble everything I need before I start, so here goes: 

Shopping List

8x8 card blank
Grey pearliised card stock
White cardstock
Phill Martin's Sentimentally Yours stamps - bracket sentiments
Phill Martin's Sentimentally Yours stamps - floral flourish and corners
Sue Wilson's complete daisy die
Sue Wilson's open daisy die
Sue Wilson embossing folder - quilted flower
Spellbinders dies - labels 28
Double sided self adhesive sheet
Cosmic Shimmer glitter jewels - diamond snow     
Black soot ink pad
Small clear dazzler
Small black self adhesive gems
Glue - I use cosmic shimmer acrylic glue
Sparkles - star 

dust

I cut a square of the grey card stock about 1/4" smaller than the card blank and glued it on using the glue.
I then cut a square of white card stock, again, about 1/4" smaller than the grey.
I stamped each side with the bracket sentiment and added a flower from the floral flourish to each corner. This was then glued to the card.

I cut a further square of white card to fit in the centre and a border of white card to go around this.

I then took the centre square and randomly stamped it using Phill's floral flourish stamps. I stuck a piece of the double sided adhesive to the top, then after peeling of the top layer sprinkled some diamond snow glitter jewels over it. This was then stuck to the centre of the card.

The frame was embossed using the quilted flower folder and stuck around the centre of the card.

Using the spellbinder dies I cut 2 - one smaller than the other, the larger in grey card and the other in white, and with the die still around the smaller one I gently shaded it using the black soot ink and a blending pad, I then removed the die and this left a nice white edge on the card. The sentiment was stamped using the same stamps as before but I masked the brackets with some tape before inking, so they wouldn't print onto the card (remember to remove them before stamping the card). These were then layered on to the centre of the card using foam pads.

I then added some black and white full and open daisies to two of the corners and finished them with a small gem or dazzler in the middle

Finally I edged the smaller of the two topper dies with the stickles.

Well that's all for now

Happy crafting

Alison

X X 


Tuesday 13 October 2015

Golden Wedding Card

Hello and welcome to blog no 3 , gosh I can't believe it.

Anyway this is a 7"x7" card made for a friend.


Firstly I cut a satin gold mat  about 1/2 cm smaller than the card and glued it on.

then cut a piece of white card stock about 1/2 cm smaller than the gold mat and used Sue Wilson's Carribean Islands  Background die, to cut the centrepiece out of the white card, placing the die near the top in the centre.

To get the background I used Sue Wilsn's fire and ice technique. To do this stick a piece of double sided adhesive on the top of the entire white card, leaving the paper on the other side for now. If you now turn the card over you will have sticky sections where he die cut the holes. Using Egyptian gold Gilding flakes I carefully added these to the sticky areas and burnished them in with a piece of rub it scrub it. Once I had tidied up and removed all excess gilding flakes I pealed the other side of the adhesive off and gently covered this with Diamond  Snow glitter jewels.

I added a pice of gold satin ribbon, to cover the cut out edge thenmounted this to the card.

Then I cut an oval topper from the same die and stamped and embossed it using Phill Martin's Elegant Milestone Anniversaries stamps and CS  gold detail embossing powder. This was then added to the card using mounting foam.

The printed names were edged with the same gold card and covered in the  Diamond Snow as above.

I finished the card by adding 2 of Sue Wilson's Charming hearts Finishing touches to the bottom and some of Sue's smallest complete camellia flowers also at the bottom and on the sentiment then added some flat backed pearls to the centre.


Thanks for popping by

Enjoy your crafting

Love

Alison


Thursday 8 October 2015

Periwinkle Birthday Card

 
Hello again

I thought I'd show a card today using some of my Sue Wilson dies by Creative Expressions.


I took a 7x7 card blank and matted it with a piece of foundation periwinkle cardstock, cut about 1/2 cm smaller than the card blank and glued it to the card.

I then cut another mat in white card, again 1/2 cm smaller than the last one,then glued this to the blue layer.

For the focal element, I cut a whole Canadian background out and trimmed it to a square, 5 sections on each side. I then cut a piece of Periwnkle card the same size and glued the background on top of it.

Using a combination of the New York, corner and border I glued these to the back of the square, the attached it to the centre of the card.

I then made a topper using the Lisbon die with yet again more periwinkle card backing it, and stamped the sentiment using Phill Martin's baroque sentiments, with the design on either side masked with some tape,when inking the stamp ( remember to remove the tape before you stamp otherwise it will be a bit on a mess!!.

I finished of by using some self adhesive pearls on the corners and crystals on the background.

Hope you like it.

Happy crafting

Alison 


Sunday 4 October 2015

Personalised Birthday Card


Hello and welcome to my blog,

I was recently watching Julia Watts on the television and she suggested that you keep a journal to record ideas and techniques that work, or don't work when making your cards.

I thought it was a great idea, but it might be nice to do it as a blog,

So here goes...........

Personalised Birthday Card


I started with a blank 7x7 white card and matted a layer of lilac foundations card stock from Creative Expressions on to it

I then cut a frame from white card, using Sue Wilsons noble double pierced squares, and a large Sue Wilson, pierced flag with the same lilac card stock and a smaller one in white card. I also cut 2 of the petite vinery finishing touches in white and 4 small camellia flowers in the lilac.

Using the centre that was cut I embossed this with Sue Wilson's Wild Rose embossing folder. Then using the de bossed side I used Phill Martin's Graceful Pink glitter paste, and Sue Wilson's, paper grouting technique I carefully spread the paste into the de bossed areas.

When dry I matted this to the centre of the card.

Next using Phill Martin's Scribbled corner sentiments Occasions, I stamped and embossed the top right corner with cosmic shimmer silver detail, embossing powder.

I also used Phill Martin's Scribbled Sentiments to emboss the Happy Birthday on the flag, and some of his Elegant alphabet to stamp and emboss the name.

I then attached the frame to the card using mounting foam and added the flags across the middle securing it with glue on the edge of the frame.

I then added the vinery to the left side of the card and a triple bow in seam binding ( Phill Martin has a u tube video showing how to do this).  


The finishing touches are a champagne bottle from tattered lace,
a flower on each of the vinery pieces and layering two flowers together adding them to the top of the bow, each with a small pearl in the centre.

Thanks for stopping by.

Please pop back soon to see more of my designs.

Happy crafting

Love 

Alison